Classic Gaming Review – Quackshot

A Fun Activity to Share

One of the interests my girlfriend and I share is our love of gaming, specifically retro gaming. She did a lot of Genesis gaming when she was a kid, while I was exposed mainly to C64 and Nintendo gaming, so we have a fun time sharing our favorites with the other and playing through them together. It’s a pretty relaxing and fun way to spend a rainy Saturday. Recently, we decided to tackle Sega’s Quackshot.

Quackshot Specifications
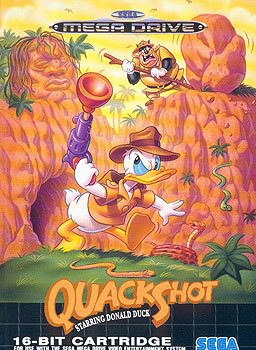
Quackshot BoxQuackshot was released in 1991 for the MegaDrive/Genesis. It’s a single player game featuring Donald Duck and many of Disney’s Ducktales characters in a platform style adventure.

The game was also released in 1998 for the Sega Saturn. We played the Genesis version on the Fusion Genesis emulator.

Overview

The story of Quackshot features Donald finding a treasure map in one of Scrooge McDuck’s old books, and deciding to set out to find said treasure. Big Bad Pete overhears this and decides to try to stop/steal the treasure from Donald. Donald flies from location to location with the help of Huey, Duey, and Louie who pilot the airplane (why not Launchpad I wonder?). The game is definitely reminiscent of Indiana Jones, and features many of the same scenes (Running from boulder ala Raiders, making a leap of faith across a chasm ala Last Crusade, mine carts ala Temple, etc).

Donald makes use of a plunger he fires from a gun as a weapon, which later can be upgraded to provide different abilities, such as sticking to walls. He also has a popcorn gun which can destroy enemies, and a bubble gum gun that can destroy blocks (makes sense!).

Thoughts

I’m a fan of side-scrolling platformers in general – especially old school 2D ones, just because they’re simple but can be challenging, especially when crazy pit jumping or enemy dodging is involved. I enjoyed this one as well – the difficulty level wasn’t bad (though we were using a game genie code), we cleared it under an hour or two (can’t remember exactly), but it wasn’t an overly long time. I both like Ducktales characters and Indiana Jones as well, so this game made the perfect combination.

Quackshot - SnowThere wasn’t a lot going on in this game – which is not a bad thing. There was a little puzzle solving, but one part I found especially annoying was the Maharajah’s Palace stage, in which you’re trapped in a maze of rooms connected by mirrors. You need to choose the right combination of mirrors to advance to the boss or else you’ll just keep retracing your steps over and over. Maybe the correct sequence was mentioned somewhere in the game, but we missed it – we had to look it up.

The last boss wasn’t bad – if you know his strategy he’s extremely easy to beat, especially as there’s a location on the screen you can’t be hit if you know the pattern. This is either good or bad depending on if you like a big challenge for the last guy. I thought he was pretty cool though, a knight just like at the end of Last Crusade.

Overall

I recommend this game if you’re looking for a fun little platformer to play and enjoy Disney characters. There’s nothing revolutionary going on in this game, but it’s colorful and fun, and the music is not bad – it’s enjoyable. And if Donald eats a bunch of Chili peppers he goes nuts and runs across the screen, invincible to enemies, that part is a HOOT. And there were a few other Disney games released by Sega at this time (reviews on those later!) so you can keep filling that cartoon video game hunger when you’re done with this one. Hurray!

From Pong to Platformers – An Introduction to Game Physics – Part 4

Acceleration for Better Goomba Stomping

So now we understand positioning an object on a screen, moving the object around using the principles of velocity, and how to handle collisions with walls and other simple objects. While we can do quite a lot with these simple fundamentals, there is one more that is key to modeling realistic movement. We can understand a little how it works by watching how Mario jumps in the Super Mario Bros series.

Physics - Mario
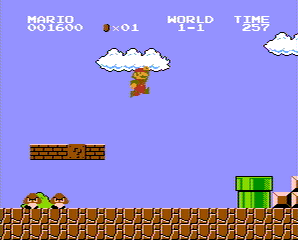
Mario jumps in an arc movement

For those who haven’t played Super Mario Bros, Mario jumps in an arc. When he begins to jump, the sprite on the screen moves up very quickly, then slows at the top of the arc, then slowly starts moving back down, until he’s going the same speed as when he started the jump when hitting the ground. The reason for this movement is due to acceleration. Specifically, the game is modeling the affects of gravity, gravity being a force that causes acceleration in the downward direction.

Just as velocity is the rate of change of an object’s position (e.g. meters per second), acceleration is the rate of change of an object’s velocity (e.g. meters per second per second). Gravity is a force that causes constant acceleration in the downward direction. Because of this, though Mario starts with a velocity that causes him to move in an upward direction, acceleration downward causes this velocity to slowly decrease, then reverse, getting faster in the opposite direction.

Programatically, we can handle this the same way we do velocity. In addition to updating position with velocity, we’ll want to update velocity with acceleration – so we’ll need two more variables, AccX and AccY. During our redraw, we’ll want to update both velocity and position: (VelX = VelX + AccX) (VelY = VelY + AccY) (X = X + VelX) (Y = Y + VelY). Acceleration can be used to model many realistic scenarios besides jumping in platform adventures, such engines firing in a spaceship simulator, or shells being fired from a cannon in a tank war game.

Onto More Advanced Topics

We’ve covered position, velocity, acceleration, and basic collisions – with these basic techniques, a wide range of realistic motions can be accomplished when making your next game. There are, however, hundreds of more topics, including friction, complex collisions, fluid dynamics, light oriented (shading, diffraction, reflection), etc. However, before getting too crazy, try some of these techniques in simple games to get familiar with Newtonian Mechanics. After that, more advanced topics will be easier to handle. Have fun with you physics!

From Pong to Platformers – An Introduction to Game Physics – Part 3

Thinking Inside the Box

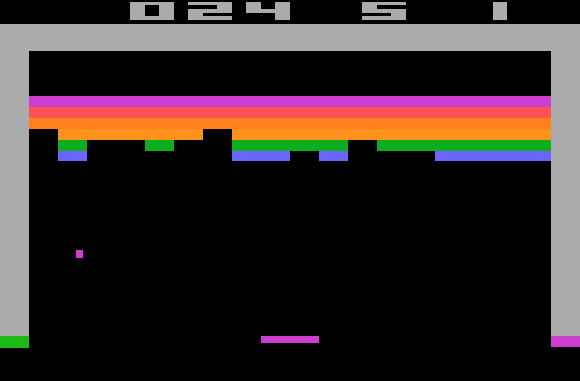
However, now that we have movement, we run into an issue. When we think of a classic video game, we think of boundaries, such as the edge of the screen, or floors/walls/ceilings, or other objects. In many games, such as platformers, these boundaries will stop the object from moving. In games such as Pong and Breakout/Arkanoid, the boundaries cause the object to bounce.

Physics - Breakout
In the classic game Breakout, the ball bounces off the walls, paddle, and bricks.

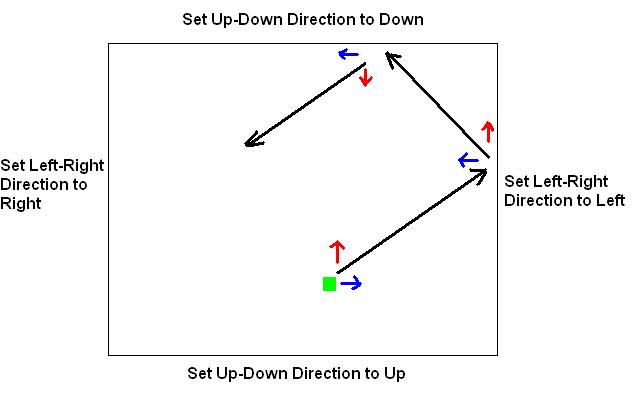
The idea of bouncing is the boundary only reverses one dimension of the ball’s direction, while the other dimensions remain unaffected. This is expected behavior that reflects real life, as remember that vectors are treated independently in each dimension. E.g. if the ball is traveling right and up, and hits the right wall, it should continue to travel up, but it should start traveling left. The right wall only affects the left-right dimension, it never affects the up-down direction. If the ball then hits the ceiling traveling left and up, the ceiling will only affect the up-down direction, and now the ball starts traveling left and down.

Physics - Bounce
Each wall only affects the direction in one dimension.

Looking back, our program currently has 4 variables. X (x position), Y (y position), VelX (x velocity), and VelY (y velocity). When redrawing our screen, in the case of boundaries, we would check to see if the ball has “hit” any boundaries – that is, if the coordinates of the ball (X and Y) reside in the same space as the coordinates of any of the boundaries. If so, we adjust the velocity accordingly. E.g. if the ball has an x velocity of 4 (traveling 4 pixels per redraw to the right) and a y velocity of -2 (traveling 2 pixels per redraw downwards), and hits the right wall, the x velocity will be reversed – that is, multiplied by -1 (VelX = VelX * -1). So now the x velocity is -4 (traveling 4 pixels per redraw to the left), and we’ve achieved our bounce. If we apply this boundary check to a movable paddle, we now have pong. If we apply this boundary check to bricks at the top of the screen, we now have breakout as well!

Onto Part 4

From Pong to Platformers – An Introduction to Game Physics – Part 2

Velocity

Velocity is a fancy word for speed with a particular direction. Going 88 MPH would be speed. Going north at 88MPH would be velocity. But forgetting the direction component for a moment, speed is measured in distanced traveled over time. For example, when we say 88 Miles per Hour, we’re saying the object is moving a distance of 88 miles over a period of an hour – i.e. the object is changing its position by that much in an hour.

Remember, our video game object has position too – it has its coordinates. If we introduce velocity into our game, we now give our object the ability to move by the laws of physics. If we redraw our object once a second, and the object is going 5 pixels right per second, we would be adding 5 to our X coordinate (the value stored in our X variable) every second, then redrawing the object. If we want it to move faster, we increase the speed, 6 pixels per second, 7 pixels per second.

Don’t Forget the Vector!

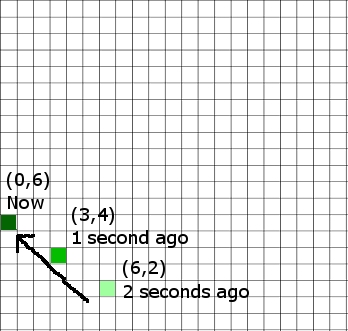
Vector is another mathematical term for a quantity with a direction involved. Remember, velocity is speed with a direction, so it is a vector. There is a helpful property of vectors that allows us to split them up by dimensions – that is, if something is moving in two dimensions at once (north and west, up and north, south and east and down), we can handle each direction separately. If something is moving north and west, we can talk about how much it’s moving in the north direction and how much it’s moving in the east directly independently. In our video game case, we can say “okay, the pong ball is traveling -3 pixels per second in the X direction, and 2 pixels per second in the Y direction). That means every second we’re going to subtract 3 from our X variable, and add 2 to our Y variable, then redraw the ball. The movement of the ball would appear to be going diagonally up and left, as seen here:

Physics - Velocity
We handled each dimension separately, but the end result was the diagonal movement.

Now we can store our X velocity and Y velocity into variables too (for example, velX and velY). So, every time we redraw the screen, we are going to add velX to X (x = x + velX), and velY to Y (y = y + velY). So if we have a very large velX, the ball will be moved across the screen very fast from left to right. If we have a very large negative velY, the ball will be moved down the screen very fast. And we don’t need to press the key each time, our velocity will do the work for us through simple addition (or subtraction if we are adding a negative number).

If we wanted to design a fun experiment, we could assign our arrow keys to change velocity. Pressing left would subtract one from velocity in the X direction, pressing up would add one to velocity in the y direction, etc. This would have the effect of making the ball move in a direction more quickly the more you press the arrow in the same direction, or slow down and start moving backwards if you press the arrow in the opposite direction. Not pressing the arrows would simply keep the ball doing whatever it was doing – e.g. traveling in whatever direction it was before.

Onto Part 3

From Pong to Platformers – An Introduction to Game Physics – Part 1

Before we get started, I feel the need to point out that this entry will in no way even begin to approach the territory of being comprehensive in the study of video game physics. This is targeted toward those who have little background in physics and is very much a starter tutorial. In general, the better and more realistic the game physics, the closer you’re getting to actual physics – and that’s a lifetime study in itself. However, there are some basic tips and tricks to know when dealing with intro action and arcade style games.

Newton and his Mechanics

While games have gone from simple squares on the screen to 2D sprites to 3D-super-rendered-polygon-ray-traced-blammo-wow objects, the actual science behind their movement on the screen has stayed relatively the same – mainly because their movement is based on the movement we’re used to, what we see all around us every day. We reproduce it in our video games (for the most part) because it’s natural and makes sense to us. We’re mirroring physics! Specifically Classical (or Newtonian) Mechanics. We generally don’t need to take into account relativity or quantum mechanics when making Mario jump from one green pipe to another.

So to understand how the pod in Lunar Lander works, we need to understand how a real lunar lander would work. But let’s start out more simply.

Mass and Position

What is mass? This is a large, fundamental question that involves inertia, resistance to movement, the amount of force necessary to move the object, etc. But we don’t need to get that deep into it. Mass is physical stuff. You have mass, a ball has mass, the planet has mass, your dog has mass, Catholic churches have Mass, etc. (ba-dum-dum). Anything physical has mass. It doesn’t start moving for the most part, it stays where it is until something pushes it (in the case of a person, your muscles). If it’s already moving, it doesn’t stop moving unless something stops it (a wall, friction, a large rope, etc). It basically keeps doing whatever it’s already doing.

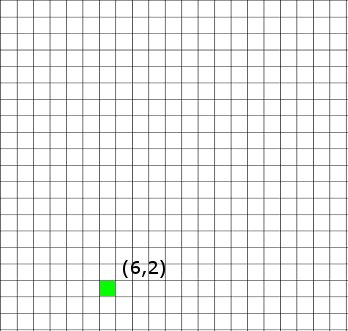
Reproducing an object that sits there and does nothing is very easy to do in a video game. Simply create a representation of an object, whether it be a colored square (Pong), a bitmap graphic (Mario), or a polygon object (Lara Croft) and put it on the screen. The actual way to do this is outside this tutorial (Check out Creating a Blackberry Game if you’d like to see how to do it in Java). Just as in the real world an object has a position, in the video game world, the object will have a position too – a coordinate on the screen. In the below example, we use a simple object that is 1 pixel in size for a pong-like game.

Physics - Object Location
The green pixel is our pong ball

When programming this, we would need to store the dot’s X coordinate and Y coordinate into variables, in this case, store a 6 in X, and a 2 in Y. If we wanted to use the arrow keys to move this object, we would simply add or subtract from the coordinates as the appropriate key is pressed (e.g. pressing up -> Add 1 to Y, pressing down -> Subtract 1 from Y, pressing right -> Add 1 to X, pressing left -> Subtract 1 from X). Then redraw the object in its new location. Our drawing routine would always just take the values and of the X and Y variables and draw a pixel at those coordinates on the screen.

While this would be enjoyable for 2-3 seconds, it would overall be a fairly boring game. We would be doing physics’ job in this case, telling the object how to move every step of the way. We want physics to carry its load. So let’s program in another property.

Onto Part 2

PSX64 – New batch in

Just a quick update, I got a batch of 50 boards in today to be assembled. I will make them up asap and get them for sale on the website!

Creating a 555 Timer Based Variable Tone Generator

I’ve finally started settling into my new job a bit more, and the huge waves of feeling overwhelmed have turned into small ripples, so time to step up the blogging again!

One love I’ve cultivated a lot over the past few years is that of EE. Designing circuits and building them is just a lot of fun. It’s almost like getting to program with physical objects and connections instead of code. At least that’s how I view it, though I’m sure the electrical engineers out there are rolling their eyes.

I like designing and working on complex digital circuits, but it’s also fun just to make quick, neat little projects. Often times they have more uses than you’d even think of.

Annoy Your Friends!

One I made a few years ago for a yankee swap gift (I made two, kept one for myself), was what I called the “Super Noise Maker 5000”. In truth, it was just a variable tone generator. I put a nice loud microspeaker and a pot on it so you could basically drive people nuts with a nice loud noise that you could twist from low to high pitch over and over again. I even put a 1/8″ mono jack so you could pump the volume up through an external amp. ๐Ÿ˜‰

Specs

Aside from annoying people, tone generators are pretty neat and have a lot of uses. Tracing lines, telcom uses, music generation, etc, they’re just a lot of fun. While the specific application you’re designing it for dictates what kind of control you have over which frequency is produced, for our purposes, we want a fun toy, so the Super Noise Maker 5000 does the following:

1. Uses a 9 volt for power (this lasts a long time, this circuit doesn’t use much juice)
2. Has a push button to activate the sound (press the button, hear the tone!)
3. Has a potentiometer to control frequency (turn knob right, lower frequency, turn right, higher frequency)
4. Has a second push button to change octaves (well, not an exact octave, but if the button isn’t pushed, its lower frequencies – push the button, it jumps to higher frequencies – you can get some awesome effects tapping this button while adjusting the frequency)
5. Has a 1/8″ mono jack for piping the sound out to a receiver/amp/recording device/whatever.
6. Onboard speaker hits high frequencies VERY well and it hurttttsss. I don’t do this too often for both my and my cats’ sake.

Super Noise Maker 5000

How Sound and Speakers Work

The theory behind this is pretty easy and is a good starter project. First off, remember that sound is a pressure wave – it is the movement of air at a frequency – these pressure waves hit your eardrum, and you hear sound. Higher frequency, or more waves per second, is a higher note – lower is lower. So speakers operate by vibrating, which produce these pressure waves at different frequencies. The speaker vibrates by the magic of magnets. Since magnets can either attract or repel each other depending on the polar orientation, speakers use this by having one permanent magnet that is always aligned with a specific polarity and an electromagnet that gets its current polarity from running current in a specific direction over it.

So if we run current back and forth over the electromagnet in the speaker at 1000 times a second, we get a 1000 hz, or 1khz tone out of the speaker. If we make the electromagnet switch poles 5000 times a second, we get a 5khz tone. Etc!

Now, the problem arises that we need to turn the steady voltage from our battery into an oscillating amount. If we just ran steady DC power over a speaker, it wouldn’t do anything except damage the speaker – the electromagnet would just stay at the same polarity, hence no sound. We need to take that steady stream of electricity and turn it into a wave, so it moves the magnet back and forth. There are a lot of ways of getting oscillated power, some are geared toward fixed amounts, but we want a variable amount (we want to control the frequency of oscillation). An awesome little chip to do this is the 555 Timer, one of the most multipurpose chips EVER, it’s great.

The 555 Timer

555 Timer The 555 timer family (when in astable mode, the 555 timer has multiple uses) takes steady voltage, say from our 9 volt battery, and pumps out a square wave, or in other words, oscillates back and forth between 0 volts and 9 volts. The frequency is driven by the use of resistors and a capacitor across its control pins – which we can control. We can either use specific resistors for a fixed frequency, or we can use a potentiometer and have a user controlled resistance, and hence frequency. There are lots of 555 timer calculators online too for figuring out what values to use for the desired frequency.

AC/DC

We still have a small problem though. Our 555 is putting out an oscillation between 0 and 9 volts. This isn’t quite what the speaker wants – instead of driving the electromagnet back and forth, we’re driving it in one direction and then turning it off over and over again. While this does make a sound, it’s not a clear sound or at the right frequency (and I’m sure not so great for the speaker). We need to turn this oscillation in DC current into AC current, i.e. instead of 0 to 9, we want -9 to 9. We want the current to go back and forth equally in both directions, not just in one direction and then not at all.

We can do this with a capacitor. Remember, a capacitor acts kind of like a little battery that can charge and discharge quickly – we can charge its terminal, and when current is removed, the capacitor discharges. This means that it will either draw or discharge current depending on if you are charging the other terminal. Hence if we put the capacitor between our 555 and the speaker, when the 555 pushes out 9 volts, the capacitor will charge and pull the current in one direction, and when the 555 goes to 0, the capacitor discharges and pushes the current the other direction. This causes AC power, since it oscillates between positive and negative, which is exactly what our speaker needs. And since it’s driven by the 555 timer, we get the correct frequency!

The Schematics

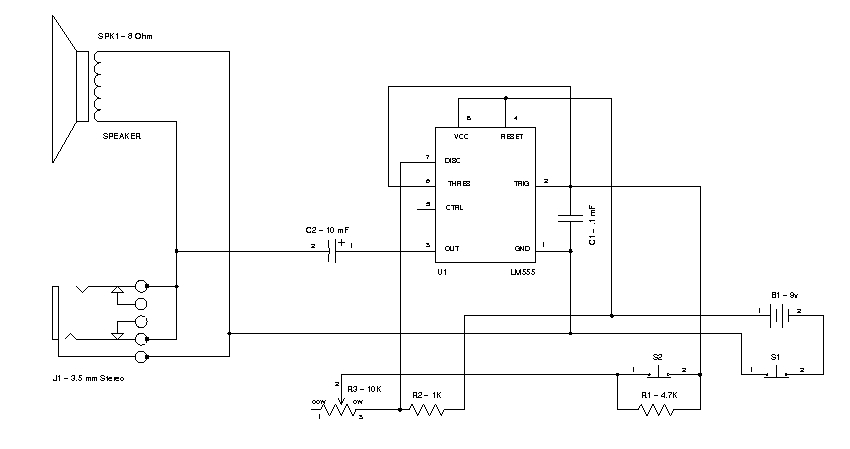
Here is a (somewhat messy, I’ve gotten better at circuit diagrams over time) schematic of the device. You can see I’ve used an LM555 timer, a speaker, stereo jack, a couple resistors, a couple buttons, a potentiometer and a couple capacitors. While this is a fun, neat little circuit to build, feel free to expand on your own and make your own ways of controlling the frequency, or combining tone generators together for multi-tone fun!

SNM5K Schematics

Creating a Blackberry GPS Tracker

As I mentioned in my article about Creating a Blackberry Game, I love this mobile phone and writing programs for it. The device has a serious amount of untapped potential. That’s not to say the phone isn’t already a great tool for its intended purposes (I don’t think I could make it without mine these days), but with the capabilities it has, there are a lot of creative ways it could be used for unconventional purposes.

Global Positioning System

One great feature of many modern Blackberrys is the built in GPS. This is an awesome technology for navigation – I don’t have a GPS in the car and my phone has saved my butt on a number of occasions. However, past that, think about the power this really gives. We’re starting to take positioning for granted these days, but the ability to pinpoint your exact location wherever you are is amazingly powerful. And not only for navigation – we have seen a number of very inventive programs popping up lately from trackers that pinpoint a lost/stolen phone, to photo tagging to attach a location to a picture taken. I’ve had lots of conversations with people as well who have great ideas for unique uses of GPSes. We’re definitely not even close to exhausting this functionality in the Blackberry.

Writing a GPS Program

When I first got my phone, I wanted to write a program to make use of the GPS. I decided I’d write a little tracker program, basically to continually read my current coordinates and post them to a website in realtime (that’s the other amazing piece about a Blackberry, the fact that you have an Internet connection whenever in cell range). The website would display these points on a google map, and people could see my current location and where I’d been (and how fast I was going!). It was a fun project, amazingly easy, and worked right off the bat!

Below is a very quick and dirty program to get the job done. It is not meant to be a polished product – it was a quick test, and I present it here as information on how to grab coordinates and upload them to a website. If you decide to make your own project, you’ll want to write the code a little more cleanly and organized – but this should give some tips on how the libraries are used. I’ve added lots of commenting to explain things as I go.

Also – a portion of the GPS code is grabbed from the RIM site I believe, though it was a long time ago and I’m not sure where. No disrespect to any code I’ve copied – if you find the original source, please post it and I’ll credit it.


tracker.java

package com.syntheticdreams.tracker;

/* This project makes use of many standard javax libraries, especially in reading the GPS.
** The microedition package in javax contains a number of mobile device related libraries, including the
** location package, which has methods specially designed for working with coordinates and 
** pulling them from a GPS.  The Blackberry supports the use of this package interfacing with its GPS (for 
** providers that have not locked the phone.  Verizon has, until recently, locked the GPS of many of its models
** from use by third party applications.)  The rest of our package importing is mainly for the user interface. */
import net.rim.device.api.ui.*;
import net.rim.device.api.ui.component.*;
import net.rim.device.api.ui.container.*;
import net.rim.device.api.system.*;
import javax.microedition.location.*;
import javax.microedition.location.Location.*;
import javax.microedition.location.Criteria.*;
import javax.microedition.io.*;
import java.util.*;

// The UiApplication is a class designed for presenting a user interface to the user and maintaining screens on a stack.  
// See Creating a Blackberry Game - Part 2 for more info (http://www.toniwestbrook.com/archives/71)
public class tracker extends UiApplication 
{
    // Our main method is always called first, starts the ball rolling
    public static void main(String[] args)
    {
        // Create a new instance of the main "tracker" class, pushes the main screen onto the stack
        tracker trackerApp = new tracker();

        // Enter the event dispatcher to intercept key and trackball events
        trackerApp.enterEventDispatcher();
    }

    public tracker() 
    {    
        // See startScreen class below, our main screen where the magic takes place.  Push it onto the stack so
        // the user sees it and the instance of the class starts running and processing.
        pushScreen(new startScreen());
    }
} 

// Our only screen to be pushed on the screen stack
final class startScreen extends MainScreen
{
    // A timer that will continually poll the GPS
    Timer updateTimer = new Timer(); 
        
    // The specific task for our timer where the dirty work takes place
    TimerTask updateTask = new TimerTask()
    {       
        // The run method is what is actually run by the timer every time it resets
        public void run()
        {
            LocationProvider lp; // LocationProvider does the actual work of reading coordinates from the GPS
            Location currentLoc; // Stores component information of our position
            Criteria cr = new Criteria(); // Settings for the GPS - we can read it at different accuracy levels
            HttpConnection httpConn;  // An HTTP socket connection class to send our results to a webserver
            String getStr; 

            // I basically set no requirements on any of the horizontal, vertical, or power consumption requirements below.  
            // The distance components are set in meters if you do want to establish accuracy - the less the accuracy, the 
            // quicker and more likely a successful read (I believe). 
            // You can also set power consumption, between low, medium, high (or no requirement)
            // There are also a number of other settings you can tweak such as minimum response time, if altitude is required,
            // speed required, etc.  It all depends on the exact application you're writing and how specific you need the info to
            // be.  For our purposes, a rough coordinate is good enough.
            cr.setCostAllowed(true);
            cr.setHorizontalAccuracy(javax.microedition.location.Criteria.NO_REQUIREMENT);
            cr.setVerticalAccuracy(javax.microedition.location.Criteria.NO_REQUIREMENT);
            cr.setPreferredPowerConsumption(javax.microedition.location.Criteria.NO_REQUIREMENT);

            try
            {
                // Get a new instance of the location provider using the criteria we established above.
                lp = LocationProvider.getInstance(cr);
 
                // Now populate our location object with our current location (with a 60 second timeout)
                currentLoc = lp.getLocation(60);
            }

            // If we hit the timeout or encountered some other error, report it.
            catch(LocationException e)
            {
                Dialog.alert("Error getting coordinates");
                return;
            }

            // If reading the GPS was interrupted, report it
            catch(InterruptedException e)
            {
                Dialog.alert("GPS Interrupted!");
                return;    
            }

            // If we made it here, we got a successful read.  I transmit it to a webserver via a simple querystring.
            try
            {
                // I build the querystring here             
                // set the "lat" querystring var with the latitude from getLatitude
                getStr = "lat=" + currentLoc.getQualifiedCoordinates().getLatitude();

                //lon with longitude
                getStr = getStr + "&lon=" + currentLoc.getQualifiedCoordinates().getLongitude();

                // alt with altitude
                getStr = getStr + "&alt=" + currentLoc.getQualifiedCoordinates().getAltitude();

                // vel with speed
                getStr = getStr + "&vel=" + currentLoc.getSpeed();

                // Now I establish an http connection the webserver running a server side script that can read the values from
                // the querystring and save them to a database.  In my case, I had a simple ASP page that wrote them to a MSSQL
                // database - this database being read by another webpage that printed said coordinates out on a google map.  
                // But you could do the same with PHP, PERL, or any other server side language of your choice.
                httpConn = (javax.microedition.io.HttpConnection) javax.microedition.io.Connector.open("http://www.yourwebsitehere.com/yourpage.asp?" + getStr);

                // Just an easy GET with a querystring.
                httpConn.setRequestMethod(HttpConnection.GET);

                // Set HTTP values
                httpConn.setRequestProperty("Connection","close");
                httpConn.setRequestProperty("Content-Length","0");

                // Make the request (e.g. send the data)
                httpConn.getResponseCode();

                // Close the socket
                httpConn.close();
            }

            // If there was an error contacting the webserver, post it
            catch (java.io.IOException e)
            {
                Dialog.alert("Error contacting web server");
                return;
            }
        }
    };

    // Our main screen's constructor
    public startScreen()
    {
        super();

        // Set the window's title
        LabelField title = new LabelField("GPS Tracker", LabelField.ELLIPSIS | LabelField.USE_ALL_WIDTH);
        setTitle(title);

        // Feel free to snazz up your program with your own messages or real time info from the GPS
        add(new RichTextField("Starting transmission..."));

        // Add the update task to the update timer, running it starting in 10 milliseconds, and then every
        // 240000 milliseconds (4 minutes)
        updateTimer.scheduleAtFixedRate(updateTask, 10, 240000);                   
    }
    
    // Cleanup on close
    public boolean onClose()
    {
       Dialog.alert("Transmission Ended!");
       System.exit(0);
       return true;    
    }
}

Nothing too bad – but very powerful! I hope this helps a bit on the road to making cool GPS applications!

I’m Back! PSX64 Sold Out (more soon)! New Job!

Lots of exclamation marks up there!

The Big Project Done

First off, I’m back to blogging after a 2-3 week hiatus finishing up fairly large programming project for work. The site has launched and things have (mostly) wrapped up. I’m glad to have done it for the experience, both the project itself and the issues that can go along with a large project, but I can’t explain how relieved I am to be done with it as well. I’ve read many horror stories concerning crunch time at dev houses (some of my favorites concerning projects at Commodore in On the Edge: the Spectacular Rise and Fall of Commodore, READ this book if you haven’t) – and while this one wasn’t a “pitch a sleeping bag under your desk for two weeks” kind of scenario, it was definitely a working into the wee hours of the morning for a while kind of deal. But it’s over, I had a very relaxing weekend of some serious video game playing, and I’m rested up for…

My New Job!

I will be starting as network administrator for Manchester Boston Regional Airport next week. I’m sad to be leaving friends at work, but I’m extremely psyched for the job. I’m a programmer and CS guy to the core, but there is a huge piece of me that misses network administration and working with a team managing infrastructure, and an airport seems like such an awesome environment to do it in. Plus, programming all day, sometimes you can get a little burnt out by the end of the day and not want to look at code at all. This has been a bummer in the past, because there are a lot of times when I want to work on private projects or blog related stuff, but have just been too pooped. Hopefully this will help that a bit. Trying to find the perfect balance.

PSX64

Lastly – I had opened up the Synthetic Dreams store to sell a small batch of PSX64s left over from conventions, and they sold out before I got a chance to advertise them. I will be putting in an order with the fab house on Wednesday, and soldering them up as soon as I get them. Look for the store to reopen with stock in the next 4 weeks. I apologize for the long wait, unfortunately it’s tough to turn out the boards as fast as I’d like to with full-time work and the time it takes to make the boards. But they are indeed coming!

Until the 19th

Just a heads up, I’m wrapping up a large project at work and it’s uber crunch time, so I’ll be posting mainly on the weekends only until the 19th. Purchasing is ready to go for the PSX64, I just had to push it off a few days unfortunately – the button to purchase will be up by this weekend.

In the meantime, for you text adventure fans like myself, check out this absolutely awesome video featuring MC Frontalot , nerdcore rapper extraordinaire (And guest appearance by Steve Meretsky!). I figured it was most appropriate with all the Gruepal work going on. ๐Ÿ™‚