Creating a PHP Graphing Calculator

When I want to learn a new technology or technique, I like to think about little projects I’ve always wanted to try, and see if the project could be implemented using the new technology.

In this case, I’ve worked quite a bit with .NET’s image and graphic related classes and methods, but had never really investigated the PHP equivalent. After reading up on PHP’s GD library, I decided to give writing a simple graphing calculator a go.

This tutorial will get you started and allow your users to enter in equations to generate graphs like this:
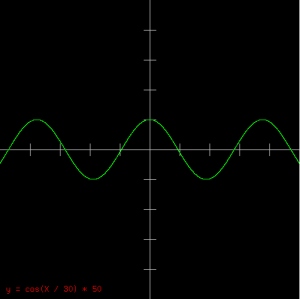
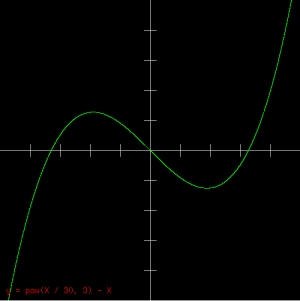
Graph 1

Graph 2

It will also let users use standard PHP functions and code, giving them use of the full math library, modulus, random functions, etc. You can do some really neat things like this:
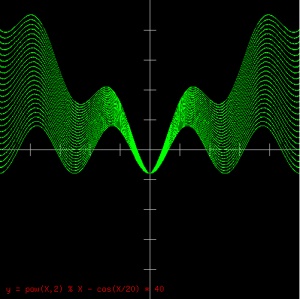
Graph 3

So let’s get started. In this example, the webpage has a single text box that takes an equation, submits back to the page, and the PHP writes an image directly to the browser. Please note, this example doesn’t do any error checking or sanitation of input – please include it in your final code, especially since this page makes use of the “eval” function which is a huge security risk.


< ? php
if ($_POST['tempBox'] != '')
{
   // width, height, and scale of graph.  These could also be user defined values.
   $GLOBALS['width'] = 500;
   $GLOBALS['height'] = 500;
   $GLOBALS['scale'] = 1;


   // drawGrid draws X and Y axis with markers every 50 points
   // We pass in the image resource to draw to
   function drawGrid($passGraphic)
   {
      // Grid is grey
      $gridColor = imagecolorallocate($passGraphic, 200, 200, 200);

      // Draw two lines, one vertical in the middle of the grid (width/2)
      // and another horizontal in the middle of the grid (height/2)
      imageline($passGraphic, $GLOBALS['width']/2, 0, $GLOBALS['width']/2, $GLOBALS['height'], $gridColor);
      imageline($passGraphic, 0, $GLOBALS['height']/2, $GLOBALS['width'], $GLOBALS['height']/2, $gridColor);
      
      // Draw a marker ever 50 points on the X axis.  We do this by starting at the center
      // of the board, then incrementing 50 with every iteration.  We also
      // draw a mark in the mirror location to cover the negative side of the axis
      for ($lcv = 0 ; $lcv < $GLOBALS['width'] / 2 / $GLOBALS['scale']; $lcv += 50)
      {
           // Set tempX and tempY to the current marker location
           $tempX = $lcv;
           $tempY = 0;
  
           // Convert to image coordinates
           cartToPixels($tempX, $tempY);

           // Draw the line
           imageline($passGraphic, $tempX, $tempY - 10, $tempX, $tempY + 10, $gridColor); 

           // Now do the same for the negative side of the axis
           $tempX = $lcv * -1;
           $tempY = 0;
           cartToPixels($tempX, $tempY);
           imageline($passGraphic, $tempX, $tempY - 10, $tempX, $tempY + 10, $gridColor); 
      } 

      // We use the same method for drawing markers on the Y axis.
      for ($lcv = 0 ; $lcv < $GLOBALS['height'] / 2 / $GLOBALS['scale'] ; $lcv += 50)
      {
           $tempX = 0;
           $tempY = $lcv;
           cartToPixels($tempX, $tempY);
           imageline($passGraphic, $tempX - 10, $tempY, $tempX + 10, $tempY, $gridColor); 
           $tempX = 0;
           $tempY = $lcv * -1;
           cartToPixels($tempX, $tempY);
           imageline($passGraphic, $tempX - 10, $tempY, $tempX + 10, $tempY, $gridColor);
      } 


   }

   // cartToPixels converts Cartesian coordinates to image coordinates, using the SCALE variable to
   // do a zoom conversion between the two.  
   // The two gotchas are, coordinates start from the center, and the Y axis goes in the
   // opposite direction (image coordinates, increase in Y goes down.  Cartesian, increase
   // in Y goes up).
   function cartToPixels(&$passX, &$passY)
   {
      // Start from the middle, otherwise 1 to 1 for X
      $passX = $GLOBALS['width'] / 2 + $passX * $GLOBALS['scale'];

      // Start from the middle, also subtract to flip for Y
      $passY = $GLOBALS['height'] / 2 - $passY * $GLOBALS['scale'];

   }

   // pixelsToCart converts from image coordinates to
   // Cartesian coordinates.  Uses the same process as
   // above but reversed.
   function pixelsToCart(&$passX, &$passY)
   {
      $passX = ($passX - $GLOBALS['width'] / 2) / $GLOBALS['scale'];
      $passY = ($passY + $GLOBALS['height'] / 2) / $GLOBALS['scale'];
   }

   // The plot function simply takes Cartesian coordinates and 
   // plots a dot on the screen
   function plot($passGraphic, $passCartX, $passCartY)
   {
      // We use green for our graphs
      $plotColor = imagecolorallocate($passGraphic, 0, 255, 0);

      // Convert Cartesian coordinates to image coordinates
      cartToPixels($passCartX, $passCartY);

      // Then draw a dot there
      imagesetpixel($passGraphic, $passCartX, $passCartY, $plotColor);
   }

   // Push out an image/png mime type to the browser so it knows
   // a PNG image is coming and not HTML
   header ("Content-type: image/png");

   // Create a new image resource with the dimensions dictated
   // by our width and height globals.  Starts off with a black
   // background automatically.
   $im = @imagecreatetruecolor($GLOBALS['width'], $GLOBALS['height'])
      or die("Cannot Initialize new GD image stream");
  
   // Draw the grid on our graph first (under everything) 
   drawGrid($im);

   // We start a loop from 0 (First pixel in width of graph) to the width end,
   // converting image X coordinate to Cartesian X coordinate, then retrieving
   // the corresponding Y Cartesian coordinate (remember, our equations are
   // in 'y =' form.  We multiply it by 50 to give a better resolution - e.g. multiple dots on
   // the Y axis for each X.  This gives us a solid line instead of a bunch of dots for steep
   // functions.  The higher the number, the smoother the line (and the slower the program)
   for ($lcv = 0 ; $lcv < $GLOBALS['width'] * 50 / $GLOBALS['scale'] ; $lcv++)
   {
      // Get the left most point on the graph in Cartesian coordinates
      $tempX = 0;
      $tempY = 0;
      pixelsToCart($tempX, $tempY);
    
      // Now get the current Cartesian X coordinate by adding our current loop 
      // value divided by 50
      $tempX += $lcv/50;
 
      // Here's where the magic happens.  In a nutshell, we're setting the Y coordinate
      // ($tempY) in relation to the current X coordinate ($tempX)
      // by using the expression specified by the user.  We use PHP's eval function,
      // which allows us to take a string (the user's input box) and run it as if it
      // were PHP code.  We're also converting X to $tempX because that's the actual
      // name of our X variable in our code, not just
      // 'X' - but we don't want the user to have to type '$tempX', so we make it easy for
      // them.  This is the line of code to be especially careful of, as a user could insert 
      // malicious PHP code and do bad things.  
      @eval("\$tempY = " . str_replace('X', '$tempX', $_POST['tempBox']) . ";");

       // Now that we have both coordinates, we plot it!
      plot($im, $tempX, $tempY); 
   }

   // We write the equation on the graph in red
   $textColor = imagecolorallocate($im, 255, 0, 0);

   // Now write the equation on the graph
   imagestring($im, 4, 10, $GLOBALS['height'] - 25, 'y = ' . $_POST['tempBox'], $textColor);

   // Output a PNG file now that it's all built
   imagepng($im);

   // Free up the resource
   imagedestroy($im);
}
else
{
? >

<html>
   <body>
      
      <div style="margin-bottom:20px; font-weight:bold; font-size:16px">Simple Grapher</div>

      <form id="graphForm" action="?< ? php echo rand(); ? >" method="post">
         Enter expression: y = <input type="input" id="tempBox" name="tempBox"> <input type="submit" value="Graph!">
      </form>

      <div style="margin-bottom:15px">Enter expression using variable X (PHP code accepted).  Both axes in range of -250 to 250.</div>
      <div>Examples:
         <ul>
            <li><a href="javascript:populate('cos(X / 30) * 50')">cos(X / 30) * 50</a></li>
            <li><a href="javascript:populate('pow(X / 30, 3) - X')">pow(X / 30, 3) - X</a></li>
            <li><a href="javascript:populate('pow(X, 2) / 15 - 200')">pow(X, 2) / 15 - 200</a></li>
            <li><a href="javascript:populate('2000 / X')">2000 / X</a></li>
            <li><a href="javascript:populate('tan(X/ 25) * 20')">tan(X/ 25) * 20</a></li>
            <li><a href="javascript:populate('-3 * X + 50')">-3 * X + 50</a></li>
            <li><a href="javascript:populate('rand() % X')">rand() % X</a></li>
            <li><a href="javascript:populate('pow(X,2) % X - X')">pow(X,2) % X - X</a></li>
            <li><a href="javascript:populate('pow(X,2) % X - cos(X/20) * 40')">pow(X,2) % X - cos(X/20) * 40 (favorite)</a></li>
         </ul>
      </div>
   </body>
</html>

< script type="text/javascript">

   function populate(passExpression)
   {
      document.getElementById('tempBox').value = passExpression;
      document.getElementById('graphForm').submit();
   }

< /script>

< ? php
}
? >

That’s it – a few things to note: We tack on a random value to the URL (check out the form code in the HTML section) to ensure our browser doesn’t show a cached copy of the image. Since its always using the same filename, the browser would almost certainly show old copies unless a refresh was requested or cache was cleared (depending on the browser).

As you might have seen from the code, generating images is very easy in PHP. We can create a new image resource using the imagecreatetruecolor function. This creates a blank resource, we can also create from preexisting images. Once we have an image resource, we can perform basic graphic functions on it like lines, dots, fill, text, etc. Once we’re done, the imagepng function can convert it into actual PNG binary code (in our case we dump it to the browser, but you can specify a filename too to save it to).

It’s definitely fun to play around with the graphic library, you can do a lot of neat things and add some needed graphics to normally text-only server side output. Have fun!

Shredz64 – Firmware Fix 1.0a, Shipping Progress, 3sat Neues

So, for anyone building your own PSX64, you may have noticed if you used firmware 1.0 that it didn’t work with guitar controllers. WHOOPS. The schematic wires the pots opposite to the way the firmware handles them, so the strum pot was handling the whammy bar, and vice versa. Firmware 1.0a fixes this and is available here for download. Sorry about that, too many late nights. 😉

Also, it looks like the prototype PCB board should arrive within the next 5-7 business days, so we’re looking at 2-3 weeks after that until we can start shipping PSX64s, not too much longer now!

Lastly, I had the honor of presenting Shredz64 for Neues, a tech program on the 3sat network (Germany, Austria, Switzerland). For those with 3sat access, keep a lookout for Shredz64!

Shredz64 – PSX64 Firmware Released

Firmware (v 1.0) for the PSX64 is now available here. This version supports improved analog stick functionality, second button support for the Amiga and Sega Master System, and improved macro handling.

Shredz64 – PSX64 Schematics Online

For those wanting to build the PSX64 interface, the schematics are now online. The plans include an ICSP port for uploading firmware to the Atmega 8 MCU. Please note, these plans assume the DIP package version of the Atmega 8 – the pinout is different for the surface mount packages. Firmware will be online within the next day or two.

If you don’t have any kind of Atmel programmer, you can build a really cheap parallel programmer using these plans. It works like a champ for programming the Atmega8.

Shredz64 – Button Two Enabled for Amiga/SMS

I needed to incorporate a few safety features into the final (for now) revision of the PSX64 design, so while I was changing hardware around, I decided to add support for the second button on Amiga and Sega systems which required more than just a firmware change (I needed to share pin 9 with both the second digital pot and a direct mapping into the MCU, so now in guitar mode the digital pot takes control of pin 9 and the MCU goes into high impedance on that pin, and vice versa when in normal controller mode.)

I tested it out with a little Mortal Kombat II on my A1200. Button one is mapped over to X, and button two is mapped over to square. Both kicking and punching worked great in MKII! I’ll be putting the schematics of this final version up tonight/tomorrow. Back to the PCB printers again!

What Language to Choose, What Compiler to Use?

Whether you’re completely new to programming, or have been out of the game for so long that you’re completely lost, an important first step in becoming a coder is choosing your first language. While it is true that learning the principles behind Computer Science is what is truly important, in practice one needs a way of implementing these important concepts, converting theoretical into reality, and a trusted language is necessary for this. There are thousands of programming languages at the disposal of the modern day programmer, and making a choice of which one to use can be a little daunting. Coupled with this, there is no one language that fits all situations, each language has its own strengths and weaknesses in different areas.

What Platform Will You be Programming For?

The first question to ask is what system are you creating software for? This isn’t simply a question of Windows vs OS X vs Linux. You could be programming console systems like your Playstation 3 or Dreamcast. You could be interested in creating applications for your smart phone, such as a Blackberry or Treo. Or perhaps you want to write a small program to run a microcontroller in a robot you’ve built.

If you are indeed completely new to programming, you may want to start by writing programs for your computer. Programming for unique architectures can often have their own slew of hiccups and peculiarities that will detract from learning core ideas. The goal is to become comfortable with the idea of programming in general, get the general concepts under your belt, then move on to the more advanced stuff as you feel more confident.

Okay, So What Language Do I Choose?

Even after making the decision of starting with your PC as a platform, the choices aren’t over yet. Most languages can be used to create programs on your desktop. The ones we tend to hear a lot about are BASIC/Visual Basic, C/C++/C#, and Java. Once you have chosen a language, you need a program called a “compiler” which converts your code into machine code the computer can understand. Below I’ve posted links to a few popular choices.

BASIC / Visual Basic

BASIC has typically been used as a beginner’s language. It’s easy to learn and quick to implement. However, the same simplicity that makes it a great language to start with also limits its potential as projects get bigger and more complex. In comes Visual Basic (especially modern day VB.NET). It combines the simplicity of BASIC’s syntax with the power of .NET and object oriented programming. While you may not be familiar with these concepts, VB.NET paves the way of making life easy until you’re ready to tackle these advanced topics.

For those looking to start with BASIC, especially one geared toward game development, Dark BASIC (http://darkbasic.thegamecreators.com/) is an excellent choice. Though it is not free, there is a trial version, and the full version is only $39.99 (at the time of this article).

If you’re looking to go with Visual Basic, which is this author’s suggestion, Microsoft currently offers Express editions of all its products, completely for free. The entire product family is incredibly powerful and a very good deal (free!). Check out Visual Basic Express 2008 (http://www.microsoft.com/express/vb).

C / C++ / C#

The C family of languages are definitely less fluffy than Visual Basic. However, this fits their purpose – less of beginner languages, and more powerful as projects get larger and more involved. This is not to say it is impossible or even a bad idea to learn programming using C – there are many concepts central to Computer Science and computer architecture in general that can be demonstrated much more clearly with C than with VB, such as memory management.

C/C++ have been around for a while and are the preferred languages in many different environments – because of which a large number of tools can be found. Again, Microsoft offers Visual Studio Express versions of their C++ compiler. The far most well known compiler, however, is the GNU compiler, which can be found on countless platforms, including UNIX, Linux, OS X, etc. For more information, check it out here (http://gcc.gnu.org/)

C# is a creation of Microsoft and tied much more closely to the .NET framework. While it may be not the perfect choice for a beginner language, it is a great language for both web application work as well as creating applications for Pocket PCs and Windows Mobile powered smart phones. Visual Studio Express also contains a C# module.

Java

Java is another interesting choice – it looks similar to C++ at first glance, but offers something quite different. Java is geared toward true cross platform portability. When you write and compile Java code, it is turned into what’s called “Byte Code” which actually runs on a virtual machine on top of your real machine. What’s neat is that while the real machine underneath can be different, each machine will run the same virtual machine, so the code you write for one platform will theoretically work for another. Java, for this reason, is an excellent choice for client side web applications and mobile applications on cell phones. When I write applications for my Blackberry, I always use Java. Sun offers its official (and free) Java compiler as a part of the Java SDK (JDK) – you can find it here (http://java.sun.com/javase/downloads/index.jsp).

You’re On Your Way

The language you begin with is important – it is your first companion as you explore the sights and wonders that are Computer Science. Don’t be too worried about picking the perfect language though – if you’re fairly comfortable with your choice you’ll be fine, and once you’ve built up some programming skills, you can easily branch out and try new languages, especially ones that might suit your needs in the particular project you’re working on. Good luck!

Shredz64 – Thanks For All the Positive Feedback!

First off, I want to thank everyone who has sent me letters through this site, SynthDreams.com and YouTube comments. It’s always exciting to know there are other people out there who appreciate having fun with older computers (especially the C64!).

Also, just a heads up, don’t be upset if I don’t respond to you quickly this week – I am extremely sick right now with a bad fever and am pretty much in bed all day except when I work up enough energy to sit at the computer for a few minutes. Once my brain clears up I’ll be sure to respond to everyone that I haven’t already.

Thanks guys!

Shredz64 – YouTube Video, EGM Interview, Updates

First off, as you can see, I’ve moved the Shredz64 project to ToniWestbrook.com, along with my other projects. I’m not quite sure why I didn’t use blogging software in the first place, but no matter now. I’ve tried to make sure everything on the old site is here on the new, along with all the new items (mentioned below). The website for my development business Synthetic Dreams is done as well, and linked at the top (www.synthdreams.com). Special thanks to Leah Shaver for a great job on the website.

From SynthDreams.com, users can download both the NTSC and PAL versions of Shredz64, as well as look for user uploaded songs. The PSX64 interface is available for preorder from the site as well. Schematics and firmware will be up within the next week.

Other big updates – I was fortunate enough to be interviewed by Michael Donahoe from Electronic Gaming Monthly (EGM) about Shredz64 a while back – the interview is in April’s issue (now out). Check it out, page 16. Just a quick interview, but very exciting none-the-less!

Also, want to actually see Shredz64 in action? Check out two YouTube videos I uploaded, one with the Zelda Overworld Theme SID by Sascha Zeidler, and the continuation with “Ex State of Mind” by Michal Hoffmann

Shredz64 in Action – Part 1
Shredz64 in Action – Part 2

Rotate, Flip, and Resize Images in .NET

Often times if you’re writing a web application that deals with user uploaded photographs and other images, a nice feature set to have is one that allows users to do basic manipulations on their photos, such as rotating, flipping, and resizing (the last being very important for download friendly images). Luckily, the .NET framework makes such functionality easy to implement.

Read the Image

Once the image has been uploaded and saved into a directory somewhere accessible by the web server, the first step common to all the procedures is to take the image data inside of the file and get it into memory usable by .NET. We do this by loading the image into a System.Drawing.Bitmap object. One of the constructors of Bitmap class can take the filename of an image, thereby automatically decoding the format and reading in the data into the Bitmap object. .NET supports the most common image formats, such as JPEG, GIF, BMP, and PNG.

        Dim PhotoBMP As Bitmap

        PhotoBMP = New Bitmap(“myfile.jpg”)

Above we have statically specified a filename, but you may, of course, dynamically pass in the filename saved on the webserver.

Flips and Rotations

Reorienting the image is incredibly easy. The Bitmap class contains a method called “RotateFlip” that does what you would think – rotates and/or flips. The RotateFlip method takes a single argument, one of RotateFlipType type. Intellisense will enumerate all the options, but each combination of rotation and flip is included: 90, 180, 270 degrees, and flips across X, Y or both axes.

        PhotoBMP.RotateFlip(RotateFlipType.Rotate270FlipNone)

Above we rotate our image clockwise 270 degrees (i.e. counter-clockwise 90 degrees). We do not perform a flip.

        PhotoBMP.RotateFlip(RotateFlipType.RotateNoneFlipY)

Above we flip our image across the Y axis but do not perform a rotation. You may also combine both flips and rotations simultaneously if desired.

Saving (and Converting) the Image

At this point, our reorientation has only been performed upon the bitmap data we have in memory, our file is still untouched. We can save our changes back to the original file, or to a new file if desired. The Bitmap class contains an easy to use Save method.

        PhotoBMP.Save(“myfile.jpg”)

Save is overloaded in a number of ways, but you may also specify a filetype as the second argument. In our example, if we wanted to convert our jpg to a png:

        PhotoBMP.Save(“myfile.png”,ImageFormat.Png)

Very easy as can be seen, no need to lookup file formats and encodings. You may also want to read in the current extension to direct what actions are taken. I use the following regular expression to parse the ending extension of the file.

        Regex.Match(FileName, ".[^.]+$")

Resizing Images

Resizing images is a little more difficult, but not too bad once you know the procedure. You start by loading bitmap data in the same fashion we did for rotating and flipping. Assuming you want to keep the image in proportion when changing the size, as well as resize with a maximum resolution in mind, we’ll need to calculate the aspect ratio of the image and our conversion coefficient. This may sound complicated, but fear not.

Calculate Aspect Ratio

There are a few methods of doing the math, but in general we know the maximum dimension we want. E.g. 1024×768, 800×600, 640×480, etc. We calculate the aspect ratio of our maximum desired size by dividing the width by the height. In these examples it is 1.333.

Then we must calculate the aspect ratio of the current image. We can obtain the width and height of our bitmap with the width and height properties of the Bitmap class. We know if we have a greater aspect ratio than our target max size’s aspect ratio, then our width is larger and is the confining dimension. If our aspect ratio is less, our height is larger and is the confining dimension. Once we know our confining dimension, to get the conversion coefficient, we divide our current image confining dimension size by the target confining dimension size.

E.g. If we’re converting 2048×1800 to a maximum of 1024×768, we calculate our target image aspect ratio, which we already know is 1.333. Then we calculate our original image aspect ratio, which is 1.138. This is less than 1.333, so we know height is our confining dimension. So we divide 1800 by 768 to get our conversion coefficient, or 2.344. Now we can calculate our target width size by dividing our current width by 2.344, which is 874. Our new image will by 874×768.

Confused? It’s not really as bad as it sounds. First you’re figuring out which dimension will match the largest dimension of your target size, then you’re decreasing the other dimension by the same amount. Here it is in code.

        OrigAspectRatio = PhotoBMP.Width / PhotoBMP.Height

        TargetAspectRatio = 1024 / 768

        If OrigAspectRatio < TargetAspectRatio
   	     ‘Height is confining
	     NewHeight = 768
	     NewWidth = PhotoBMP.Width / (PhotoBMP.Height / 768)
        Else
	     ‘Width is confining
	     NewWidth = 1024
  	     NewHeight = PhotoBMP.Height / (PhotoBMP.Width / 1024)
        End If

Perform the Resize

Now we have our target width and height via good old fashioned math, now the technical bits for .NET to perform its magic. .NET can perform resizing via the Graphics class, by resizing data from the original bitmap data into a new, smaller bitmap. First we make a new, blank Bitmap of the correct new size.

        NewBMP = New Bitmap(newWidth, newHeight)

Then we create a new Graphics image using the reference of this new Bitmap object.

        ConvertGraphics = Graphics.FromImage(NewBMP)

Then we specify the method of scaling the image. Different methods work better for different amounts of scaling, but High Quality Bicubic is the one I tend to use.

        ConvertGraphics.InterpolationMode = Drawing2D.InterpolationMode.HighQualityBicubic

Now comes the actual conversion, we use the DrawImage method to draw our original bitmap into the new bitmap at the new size (at the starting coordinates of 0,0 in the new bitmap

        ConvertGraphics.DrawImage(PhotoBMP, 0, 0, NewBMP.Width, NewBMP.Height)

Dispose our old bitmap

        PhotoBMP.Dispose()

Save our new

        NewBMP.Save(“new.jpg”, ImageFormat.Jpeg)

And dispose

        NewBMP.Dispose()

And we’re done! You can also use the Graphics object to perform a number of paint-oriented operations on your image, such as lines and drawing text, but that you can have fun experimenting with.

With the exception of resizing which requires a few calculations, .NET makes image manipulation exteremly easy, and when combined into a web application, offers users some useful tools at virtually no cost to you.

Dynamically Truncate SQL Parameters in .NET

[SQL Server] String or Binary data would be truncated.

Run into this error before? The cause is usually fairly clear, we’re attempting to insert or update a field in a table with more data than it can hold. E.g. we’ve executed a SQL insert statement that attempts to assign a string 100 characters in length to a varchar field that can hold 80 characters max. Microsoft SQL Server complains, and we receive a nice error in our .NET application.

Solution 1: Don’t send too much data

This is an easy solution (and not the purpose of the article) and not always possible, but it is completely valid and often times desirable if you are writing an application that works with a SQL database in a static manner where the fields you’re updating are known ahead of time. There are a number of ways to ensure you don’t exceed the maximum size of a field.

If your data is coming from a form item, such as a text box, ensure the maximum size of the text box doesn’t exceed the maximum size of the field in the database. If you’re working with items that cannot be limited, simply take a substring of the data and manually truncate it to a size allowed by the field in the database. Many times we know what data and what sizes we’re working with at design time.

Solution 2: Read field sizes from database and dynamically truncate data

There are many times when solution 1 is not an option, mostly in situations where the database we’re working with is unknown, whether partially or fully, at design time. I’ve worked on a number of ETL tools and interoperability oriented applications where I can’t know the field size in the database at design time, it must be discovered at runtime.

One of the great parts about ADO.NET is the ease in which it deals with parameters. At the core of executing SQL statements is the SqlCommand (or OleDbCommand, or odbcCommand) class. After obtaining an instance associated with a database connection, we assign our SQL statement to it and all our parameters and values to it. In our case, the size of the parameter values we assign to it may exceed the maximum size of our receiving database fields. We need a method of iterating through each parameter and ensuring the value assigned isn’t too big.

Reading table schema

The heart of this routine is detecting which table you’re dealing with, then reading the schema of that table, then discovering the max size of each field.

I start by declaring a sub procedure that takes a SqlCommand as argument by reference.

        Sub TruncateParameters(ByRef passCommand As SqlCommand)

I then declared the following variables

        Dim targetTable As String 
        Dim LCV As Integer
        Dim tableCommand As SqlCommand
        Dim tableReader As SqlDataReader
        Dim tempRow As DataRow

targetTable is the name of the table we’ll be checking. I read it from the actual SQL statement in the SqlCommand – but I was dealing with fairly simple SQL statements. You may want to manually pass the table names in if you’re dealing with SQL statements that will be difficult to parse.

tableCommand, tableReader, and tempRow will be used to read in the schema of our targetTable.

Next I parse the SQL statement inside of passCommand to obtain the targetTable name, but again, you may want to manually pass the name of the table ahead of time if you’re dealing with difficult to parse SQL statements. Also, if you are familiar with regular expressions, you can pare this routine down quite a bit – I present it here completely algorithmically for people who aren’t familiar with regular expressions.

       If passCommand.CommandText.ToLower().IndexOf("update") > -1 Then
             'UPDATE command
             targetTable = passCommand.CommandText.Substring(passCommand.CommandText.ToLower().IndexOf("update") + 7)
       Else
             'INSERT command
             targetTable = passCommand.CommandText.Substring(passCommand.CommandText.ToLower().IndexOf("insert") + 12)
       End If

       targetTable = targetTable.Substring(0, targetTable.IndexOf(" "))

Next we read (up to) 1 row from our target table to obtain the schema.

        ' Open Data Reader for schema table
        tableCommand = New SqlCommand("SELECT TOP 1 * FROM " & targetTable, passCommand.Connection)
        tableReader = tableCommand.ExecuteReader()

This is where the magic happens – we iterate through each parameter in our passCommand, examine the field matching the parameter, get its max length, then truncate the value assigned to each respective parameter to the max size of the field. This routine assumes that you’ve used the same parameter names as field names. If you haven’t, you would need to do further parsing of the SQL statement to deduce a parameter name -> field name mapping. This routine is also targeted for strings, but would work just as well for binary data assuming you had a method of truncating such data. Also, there are a lot of shortcuts for doing case insensitive compares, my style is to convert to lower case and compare as I can never remember what is case sensitive and what is not. Feel free to use your own style.

        ' Loop through each parameter

        For LCV = 0 To passCommand.Parameters.Count - 1
            For Each tempRow In tableReader.GetSchemaTable().Rows
                If "@" & tempRow("ColumnName").ToString().ToLower() = passCommand.Parameters.Item(LCV).ParameterName.ToLower() Then
                    If tempRow("DataType").ToString().ToLower() = "system.string" Then
                        If passCommand.Parameters.Item(LCV).Value.ToString().Length > tempRow("ColumnSize") Then
                            passCommand.Parameters.Item(LCV).Value = passCommand.Parameters.Item(LCV).Value.ToString().Substring(0, tempRow("ColumnSize"))
                        End If
                        Exit For
                    End If
                End If
            Next
        Next

Finally, we close out our connection and end the sub procedure.

        tableReader.Close()

End Sub

There is some work involved, but the idea of the above routine can be customized to fit your situation. Once you have a solid parameter truncating routine in your arsenal, you can call it for any SqlCommand object, and ensure you never get a “String or Binary data would be truncated.” error message again!